해당 강의에서 말하는 "토비의 스프링 부트 1 - 스프링 부트 앱에 초기화 코드를 넣는 방법 3가지"
들으면서, 궁금했던 내용들을 함께 풀어가면서 해결해봅시다.
ApplicationRunner 와 CommandRunner의 차이는 무엇일까?
package org.springframework.boot;

import org.springframework.core.Ordered;
import org.springframework.core.annotation.Order;

/**
 * Interface used to indicate that a bean should <em>run</em> when it is contained within
 * a {@link SpringApplication}. Multiple {@link CommandLineRunner} beans can be defined
 * within the same application context and can be ordered using the {@link Ordered}
 * interface or {@link Order @Order} annotation.
 * <p>
 * If you need access to {@link ApplicationArguments} instead of the raw String array
 * consider using {@link ApplicationRunner}.
 *
 * @author Dave Syer
 * @since 1.0.0
 * @see ApplicationRunner
 */
@FunctionalInterface
public interface CommandLineRunner {

	/**
	 * Callback used to run the bean.
	 * @param args incoming main method arguments
	 * @throws Exception on error
	 */
	void run(String... args) throws Exception;

}
/**
 * Interface used to indicate that a bean should <em>run</em> when it is contained within
 * a {@link SpringApplication}. Multiple {@link ApplicationRunner} beans can be defined
 * within the same application context and can be ordered using the {@link Ordered}
 * interface or {@link Order @Order} annotation.
 *
 * @author Phillip Webb
 * @since 1.3.0
 * @see CommandLineRunner
 */
@FunctionalInterface
public interface ApplicationRunner {

	/**
	 * Callback used to run the bean.
	 * @param args incoming application arguments
	 * @throws Exception on error
	 */
	void run(ApplicationArguments args) throws Exception;

}
run Method에서 매개변수로 받는 부분이 다르다. CommandLineRunner는 Raw한 String으로 받는 반면, ApplicationRunner는 ApplicationArguments 로 받는다.
사용방법은 아래와 같다.
package com.like.len.springbootstudy;

import org.springframework.boot.CommandLineRunner;
import org.springframework.boot.SpringApplication;
import org.springframework.boot.autoconfigure.SpringBootApplication;
import org.springframework.context.annotation.Bean;
import org.springframework.stereotype.Component;

@SpringBootApplication
public class SpringbootStudyApplication {

    public static void main(String[] args) {
        SpringApplication.run(SpringbootStudyApplication.class, args);

    }

    @Bean
    public CommandLineRunner myCliRunner(){
        return new MyCliRunner();
    }
}

@Component
class MyCliRunner implements CommandLineRunner {

    @Override
    public void run(String... args) throws Exception {
        System.out.println("Hello CommandLineRunner");
    }
}
ApplicationRunner 도 마찬가지로 동작된다.
마지막 3번째 방법은 EventListener 을 사용하는 방법이다.
이벤트 리스너
간단한 예시는 아래와 같다.
@SpringBootApplication
public class SpringbootStudyApplication {

    public static void main(String[] args) {
        SpringApplication.run(SpringbootStudyApplication.class, args);

    }

    @EventListener(ApplicationReadyEvent.class)
    public void init(){
        System.out.println("Hello ApplicationReadyEvent~!");
    }
}
Springboot 안에서 이벤트를 사용할 수 있는 방법은 다양하다.
@SpringBootApplication
public class SpringbootStudyApplication {

    public static void main(String[] args) {
        SpringApplication.run(SpringbootStudyApplication.class, args);
        ConfigurableApplicationContext ac = SpringApplication.run(SpringbootStudyApplication.class, args);
        ac.addApplicationListener(new ApplicationListener<MyEvent>() {
            @Override
            public void onApplicationEvent(MyEvent event) {
                System.out.println("Hello MyEvent: " + event.message);
            }
        });
        ac.publishEvent(new MyEvent(ac, "LenSpringBoot Event"));
    }
}
여기서 SpringApplication.run() 을 동작하면 ConfigurableApplicationContext 나온다는 사실을 처음 알았다.
ApplicationContext 의 conext를 이어서 가져오는 객체
static class MyEvent extends ApplicationEvent {

        private final String message;

        public MyEvent(Object source, String message){
            super(source);
            this.message = message;
        }
    }
}
또 다른 방법으로.
public static void main(String[] args) {
        ConfigurableApplicationContext ac = SpringApplication.run(SpringbootStudyApplication.class, args);
        ac.publishEvent(new MyEvent(ac, "LenSpringBoot Event"));
    }


    @EventListener(MyEvent.class)
    public void onMyEvent(MyEvent myEvent){
        System.out.println("Hello My Event");
    }
    ...
}
dnl위 코드에서는 ac.publishEvent에서 이벤트를 퍼블리쉬하는데, 이 때 MyEvent는 아래 EventListener에 의해서 동작됩니다.
또는 아래와 같이할수도 있습니다.
@EventListener
public void onMyEvent2(MyEvent event){
	System.out.println("Hello My Event" + event.message);
}
만약 어노테이션을 활용하는 방법이라면? 아래와같이 작업할 수 있습니다.
    @MyEventListener
    public void onMyEvent(MyEvent event){
        System.out.println("Hello My Annotation Event");
    }

    @Target(ElementType.METHOD)
    @Retention(RetentionPolicy.RUNTIME)
    @EventListener
    @interface MyEventListener {

    }
ApplicationReadyEvent 의 정체는 무엇인가?
@EventListener(ApplicationReadyEvent.class)
public void onMyEvent(){
	System.out.println("Application Ready!!!");
}
먼저 ApplicationReadyEvent 의 Javadoc를 살펴보면 아래와 같다.
package org.springframework.boot.context.event;

import org.springframework.boot.SpringApplication;
import org.springframework.context.ConfigurableApplicationContext;

/**
 * Event published as late as conceivably possible to indicate that the application is
 * ready to service requests. The source of the event is the {@link SpringApplication}
 * itself, but beware of modifying its internal state since all initialization steps will
 * have been completed by then.
 *
 * @author Stephane Nicoll
 * @since 1.3.0
 * @see ApplicationFailedEvent
 */
@SuppressWarnings("serial")
public class ApplicationReadyEvent extends SpringApplicationEvent {

	private final ConfigurableApplicationContext context;

	/**
	 * Create a new {@link ApplicationReadyEvent} instance.
	 * @param application the current application
	 * @param args the arguments the application is running with
	 * @param context the context that was being created
	 */
	public ApplicationReadyEvent(SpringApplication application, String[] args, ConfigurableApplicationContext context) {
		super(application, args);
		this.context = context;
	}

	/**
	 * Return the application context.
	 * @return the context
	 */
	public ConfigurableApplicationContext getApplicationContext() {
		return this.context;
	}

}
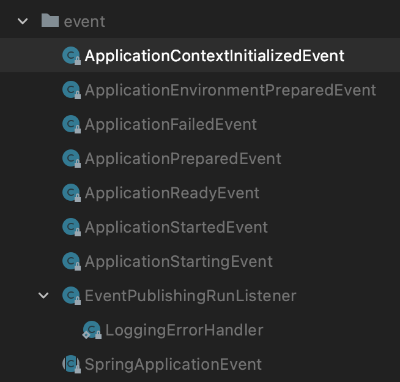
먼저 boot 안에 있는 클래스라는 사실과 함께, SpringApplicationEvent를 상속받습니다. 비슷한 성격을 클래스로는

이렇게 있습니다.
그럼 각각의 이벤트는 언제 일어나는가? 이는 SpringApplication.class 을 잘 살펴보면 찾을 수 있다.
	/**
	 * Run the Spring application, creating and refreshing a new
	 * {@link ApplicationContext}.
	 * @param args the application arguments (usually passed from a Java main method)
	 * @return a running {@link ApplicationContext}
	 */
	public ConfigurableApplicationContext run(String... args) {
		StopWatch stopWatch = new StopWatch();
		stopWatch.start();
		DefaultBootstrapContext bootstrapContext = createBootstrapContext();
		ConfigurableApplicationContext context = null;
		configureHeadlessProperty();
		SpringApplicationRunListeners listeners = getRunListeners(args);
		listeners.starting(bootstrapContext, this.mainApplicationClass);
		try {
			ApplicationArguments applicationArguments = new DefaultApplicationArguments(args);
			ConfigurableEnvironment environment = prepareEnvironment(listeners, bootstrapContext, applicationArguments);
			configureIgnoreBeanInfo(environment);
			Banner printedBanner = printBanner(environment);
			context = createApplicationContext();
			context.setApplicationStartup(this.applicationStartup);
			prepareContext(bootstrapContext, context, environment, listeners, applicationArguments, printedBanner);
			refreshContext(context);
			afterRefresh(context, applicationArguments);
			stopWatch.stop();
			if (this.logStartupInfo) {
				new StartupInfoLogger(this.mainApplicationClass).logStarted(getApplicationLog(), stopWatch);
			}
			listeners.started(context);
			callRunners(context, applicationArguments);
		}
		catch (Throwable ex) {
			handleRunFailure(context, ex, listeners);
			throw new IllegalStateException(ex);
		}

		try {
			listeners.running(context);
		}
		catch (Throwable ex) {
			handleRunFailure(context, ex, null);
			throw new IllegalStateException(ex);
		}
		return context;
	}
댓글